If you want to use Secure DNS in Google Chrome, and the computer is in a Windows domain, the following information appears: This setting is managed by your administrator !!
In Google Chrome settings, the “Use secure DNS” option cannot be enabled; the slider on the right is inactive (grayed out). This occurs when the computer belongs to an organization and is part of a Windows domain. A pop-up window appears above the icon stating that this setting is managed by your administrator.
The “Use secure DNS” setting can still be enabled. To do this, two registry keys need to be added. Open a command prompt as administrator and run the following lines using copy and paste.
After adding the registry keys, Chrome needs to be restarted; the DNS settings will still not be displayed, but will be applied by Chrome.
How can I verify “Chrome Secure DNS” ?
In the Chrome address bar type chrome://net-internals/#dns and press Enter. Now enter URL in the Domain field, e.g., news.google.com and click Lookup.
This should display output similar to the following::
Resolved IP addresses of “news.google.com”: [“142.250.204.142”]. No alternative endpoints.
Also helpful and possibly necessary is clearing the host cache, and possibly flushing socket pools under Sockets.
In managed organizations, Google Chrome may still need to be checked for policies, using the URL chrome://policy/#dns
What is Secure DNS?
Secure DNS (Domain Name System) is a service that protects your internet traffic by encrypting DNS queries and filtering out malicious websites. It prevents third parties, such as Internet Service Providers (ISPs), from tracking your browsing habits and safeguards against redirection to phishing sites. The primary technologies are DNS over HTTPS (DoH) or DNS over TLS (DoT).
This article describes how to set up filter rule using GS Wave GDMS, UCMRC, and CloudUCM. These rules apply to security appliances such as firewalls, where devices and apps with UC capabilities need to interact with STUN servers, such as GS Wave communication, UCM-GDMS communication, telephone and proxy servers, and UCM endpoint communication.
Description
The necessary services and ports are identified to provide a rule set using on security appliances, when GeoIP or other country-managed geographical indications restricted global accessibility.
Configuration filter rule Wave UCMRC
Instructions on how to configure and set up the filter rule.
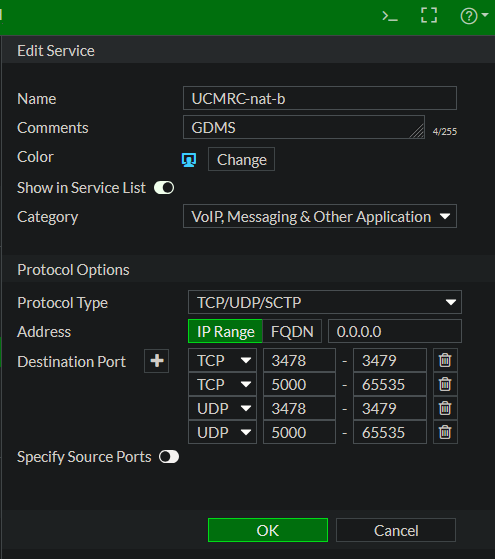
Here on a FortiGate, go to Policy & Objects -> Services -> Create New.
Enter a name, for example: UCMRC-nat-b, and add the UDP and TCP ports as shown next.
Alternatively, you can also add the custom service ports out from the CLI, the commands can be found in the file service.txt. Verify the action with the following command:
show firewall service custom "UCMRC-nat-b
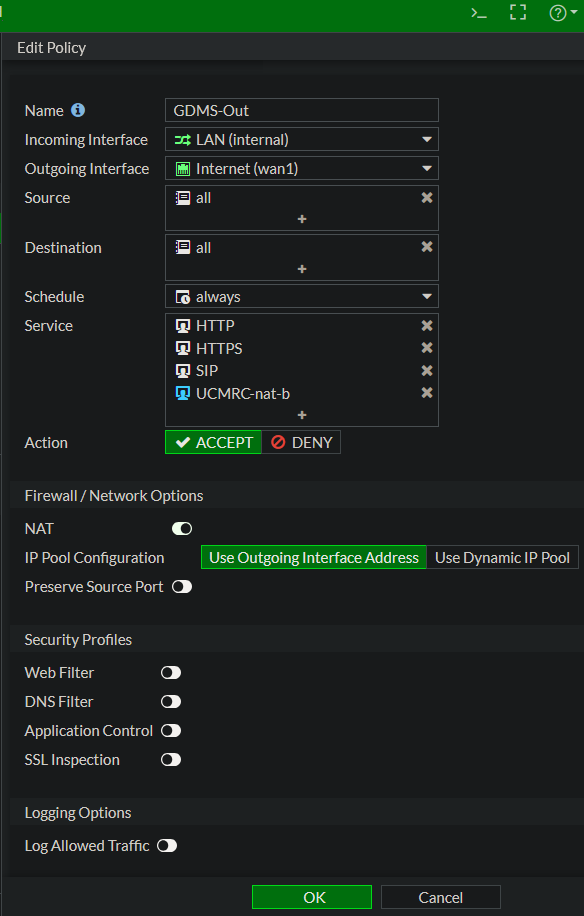
Next, go to IPv4 Policy and right-click, then select from the context -> Insert Empty Policy -> Above. This policy must be before the GeoIP blocking policy, you can also move up and down later.
Edit the policy as shown in the image.
The new policy should look something like this in the policy overview.
Finaly, create an identical policy in reverse order from WAN to LAN with the same services, this rule must also be placed before the GeoIP blocking rule.
Usage
Use your GS Wave App and call a participant and try to invite participants to conferences, making sure that the audio sound transmission is passed for/to all participants and that everyone can understand each other.
Addendum
If they wish to consider narrow it down, the origin from the voip-whitelist.txt can be take for the rule. This allows the IPs extracted from iplist (https://www.gdms.cloud/server/info/index.html/iplist.json) to be used as an address object in a proxy policy.
To do this, go to Security Fabric -> Fabric Connector – Create New. A page with round icons will open, select IP Address, enter a name, and in the “URI of external resource” field, enter the RAW URL to voip-whitelist.txt. Then add the newly created connector as a Source/Destination in the proxy policy.
When using the Grandstream UCM6300 Ecosystem and its endpoints like Wave, log in to the UCM as a super administrator and go to the RemoteConnect option (an UCMRC service plan is required). Under the “My Plan” tab, you will find the STUN Address, containing the server domain, for example, nat-b.gdms.cloud.
This address corresponds to the list published by GS, including IP addresses, domains, protocols, and ports (https://www.gdms.cloud/server/info/index.html/#/).
Cause
Peer Blocking:
After your device obtains its public IP address via the STUN server, it attempts to send and receive data packets directly to and from the peer.
Even if your device sends the first packet (hole punching), many firewalls with GeoIP filters block the peer’s response at the WAN interface if the peer’s IP address originates from a restricted country.
In this case, the data packet (e.g., the audio signal during a phone call) never reaches your LAN device, even though the connection should technically be established.
Stateful Inspection vs. GeoIP:
Modern firewalls are stateful, meaning they automatically allow responses to outgoing requests.
The problem: GeoIP filters often intervene before the connection status has been checked. If a GeoIP rule states “Block everything from country X”, the packet from the remote end is often immediately discarded, even before the firewall recognizes that your LAN device actually requested this packet.
Contributing
Everyone is free to use and distribute this post without restriction; however, all use is at your own risk, and any liability is excluded.
Disclaimer
The author assumes no liability for the accuracy, completeness, or timeliness of the information provided.
Liability claims against the author for damages of a material or immaterial nature arising from access to or use or non-use of the published information, from misuse of the connection, or from technical malfunctions are excluded.
License
unblog/voip-whitelist is licensed under the MIT License.