

To flash a Raspberry Pi, download the official Raspberry Pi Imager and use it to write an operating system directly to your microSD card or USB drive. This process will erase all existing data on the drive.
Prerequisites
- A microSD card (Class 10, minimum 8 GB recommended).
- A microSD-to-USB or SD card adapter for your computer.
- An internet connection to download the OS.
Step-by-Step Guide
Download the Raspberry Pi Imager for Windows, Mac, or Linux.
Meanwhile, in the CLI it’s simply done in a Linux terminal with:
sudo apt install rpi-imagerIf you prefer Windows then you can open a Windows terminal:
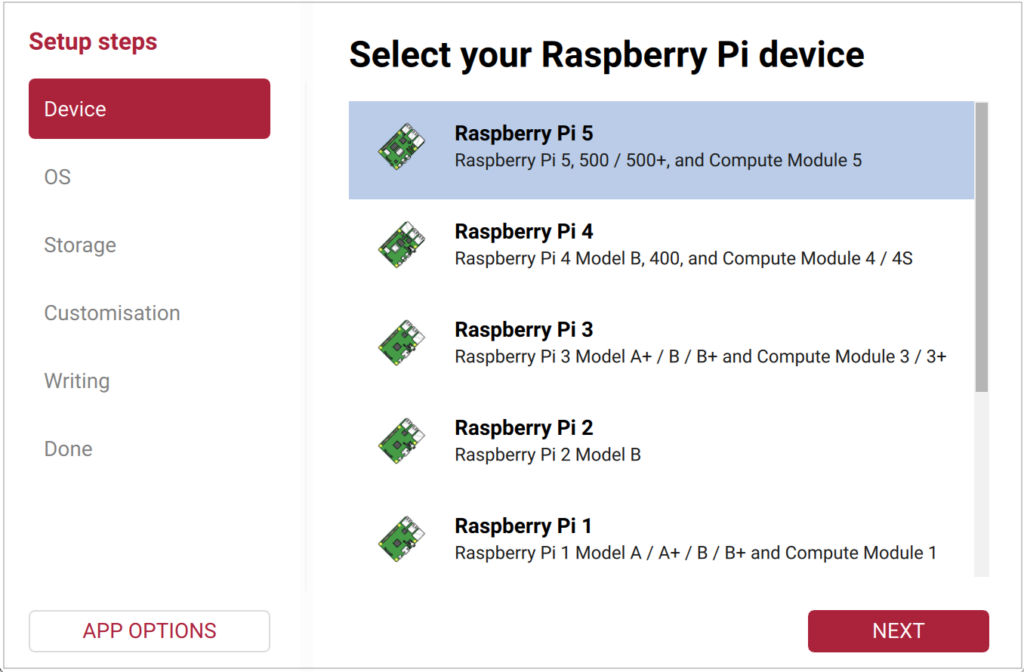
winget install rpi-imagerLaunch the Raspberry Pi Imager and select Device. Select the exact Raspberry Pi model you are using to ensure optimal compatibility..
Click OS and select your preferred operating system (e.g., Raspberry Pi OS, Debian).

Insert your microSD card into your computer, click Storage and carefully select your microSD card from the list.
Customisation (Highly Recommended): Here, you can pre-configure the hostname, a username and password, Wi-Fi credentials, your time zone, and enable SSH for remote access, more in the next section.
Flash: Click Next or Write, confirm the warning that all data will be erased, and wait for the software to write and verify the image.
Boot Up: Once complete, safely eject your microSD card, insert it into your Raspberry Pi, and power it on.
Configuring Wi-Fi or SSH without a monitor (headless setup)
if you don’t have a monitor connected. To set up a headless Raspberry Pi (without a monitor, keyboard, or mouse), use the Raspberry Pi Imager to pre-configure your network and access settings before flashing.
1. Configure OS Customization
When you click Next or Write in the Raspberry Pi Imager, a prompt will ask if you want to apply OS customization settings. Click Edit Settings.
2. General Tab (Network & User)
- Set Hostname: Give your Pi a unique name (e.g., raspi.local).
- Set Username and Password: Create a secure custom username and password. The default “pi/raspberry” credentials no longer exist.
- Configure Wireless LAN: Check this box to enter your exact Wi-Fi SSID (name) and Password. Set your Wireless LAN country code (e.g., DE, US, GB) to enable the Wi-Fi chip.
3. Services Tab (Remote Access)
- Enable SSH: Check this box.
- Authentication: Choose Use password authentication for the easiest setup.
4. Connect to Your Pi
- Flash and Boot: Save the settings, finish flashing, insert the card into the Pi, and power it on. Wait 2 minutes for the initial boot.
- Find the IP Address: Open your computer’s terminal or command prompt and type:
ping raspi.local
(Replace raspi with your chosen hostname. Note the IP address it returns). 3. Log In via SSH: Connect from your computer’s terminal using your configured username:
ssh username@raspi.local
- Enter Password: Type your password when prompted (no characters will show as you type) and press Enter.
Troubleshooting:
if the Pi does not connect to your Wi-Fi
If your Raspberry Pi fails to connect to Wi-Fi after a headless setup, the issue usually stems from typo errors, frequency band mismatches, or OS-specific network behaviors.
Follow these targeted troubleshooting steps to get your Pi online.
1. Verify Common Network Pitfalls
- Check the Frequency Band (Pi Zero / Pi 3): The Raspberry Pi Zero W, Zero 2 W, and older Pi 3 models only support 2.4GHz Wi-Fi. If your home router combines 2.4GHz and 5GHz into a single network name (Smart Steering), the Pi may fail to connect. Temporarily split bands in your router settings or use a dedicated 2.4GHz guest network.
- Double-Check for Typos: Wi-Fi network names (SSIDs) and passwords are strictly case-sensitive. Re-flash the SD card using the Raspberry Pi Imager to ensure no hidden spaces or wrong characters were entered.
- Verify the Wi-Fi Country Code: Raspberry Pi OS disables the Wi-Fi chip by default until a valid Wi-Fi country code (like US, GB, or DE) is set. Make sure this was selected in the Imager’s advanced settings.
- Check Encryption Types: Most Raspberry Pis struggle with modern WPA3 encryption. Ensure your router set to WPA2 Personal (AES).
2. Isolate the Issue Using a Mobile Hotspot
To determine if your home router is blocking the Pi, configure a secondary test network:
- Turn on the Mobile Hotspot feature on your smartphone.
- Set the hotspot frequency band to 2.4 GHz (if your phone allows it).
- Re-flash your SD card with the Raspberry Pi Imager, inputting your phone’s exact hotspot name and password.
- If the Pi successfully connects to your phone, your home router’s security configuration or band layout is preventing the connection.
3. Bypass Wi-Fi Temporarily (Ethernet / USB Gadget)
If the Wi-Fi refuse to connect, you can bypass wireless setup entirely to log in and diagnose the problem:
- Use an Ethernet Cable: If your Pi model has an Ethernet port (like the Pi 4 or Pi 5), plug it directly into your router. It will bypass Wi-Fi and pull an IP address instantly. You can then log in SSH and manually fix the Wi-Fi config.
- USB Gadget Mode (Pi Zero Only): You can power and data-link a Pi Zero directly to your computer using a regular micro-USB/USB-C data cable. By adding dtoverlay=dwc2 to the config.txt file on your flashed SD card, you can SSH over USB via ssh username@raspi.local.
- Depending on your operating system version, this file is located at either /boot/firmware/config.txt (for newer versions like Raspberry Pi OS Bookworm) or /boot/config.txt (for older legacy systems).
sudo nano /boot/firmware/config.txt(Note: If the file is empty, press Ctrl+X to exit and try sudo nano /boot/config.txt instead).
Scroll to the very bottom of the file and add the line:
dtoverlay=dwc2Save and exit by pressing Ctrl+O, Enter, and then Ctrl+X, then reboot your Raspberry Pi.
Note: If an error occurs when trying to log in to the Raspberry Pi via SSH, you can use SSH with the verbose switch.
ssh -v username@192.168.1.1Replace the placeholder IP with your Raspberry Pi’s actual IP address.
4. Find Raspberry Pi IP address in local subnet
This is where the execution of ping in a for-loop help us. This example send ping to all IPv4 addresses of a subnet from the command prompt. Run in a one-liner to find the IP addresses that are currently online.
for /l %i in (1,1,255) do @ping 192.168.1.%i -w 1 -n 1 | find /i "ttl="5. Important Note for Recent OS Releases (Bookworm)
If you are using the latest Raspberry Pi OS (Bookworm), be aware that the legacy wpa_supplicant.conf trick no longer works. Network configurations are now handled strictly via NetworkManager. Do not manually create a wpa_supplicant.conf file on the boot partition, as the OS will completely ignore it. Always rely on the OS Customization settings inside the official Raspberry Pi flash imager. If you are still stuck, let me know.


")